HireCraft User Manual
Version 4.0
HireCraft Software Private Limited
#412,
K.R Road, Banashankari 2nd Stage,
Bangalore-
560070, Karnataka,
India.
About HireCraft Software Pvt Ltd:
HireCraft® is a pioneer in building the
next generation automation technology to world’s leading Enterprises to manage
their Talent Acquisition, Staffing Business needs, Government initiatives for
employment creation and Talent Management...
“HireCraft,” the HireCraft logo, and HireCraft’s Sub product
names are trademarks of HireCraft. References to other companies and their
products use trademarks owned by the respective companies and are for reference
purpose only.
No portion of this manual may be reproduced or transmitted
in any form or by any means, electronic or mechanical, including photocopying,
recording, or information storage and retrieval systems, for any purpose other
than the purchaser’s personal use, without the express written permission of
HireCraft Software Private Limited.
Notice: The information contained
in this document is subject to change without notice. HireCraft Software
Private Limited shall not be liable for errors contained herein or
consequential damages in connection with the furnishing, performance, or use of
this material.
Table of
Contents:
Planner………………………………………………………………………………………………………….………………………………6
Creating and managing tasks
Grid view of Task
Workbench……………………………………………………………………………………...…………….………………………….10
Client
Manager………………………………………………………………………………………………………………………….11
Creating a Client Manager
Creating a Department
Capturing Line Manager Contacts
Vendor
Manager………………………………………………………………………………………………………………………15
Capturing
Vendor details
Capturing Vendor Contacts
Parsing
Resumes…………………………………………………………………………………………………………………….17
Folder Parsing
Mail Parsing
Portal Resume Parsing
Requirement
Manager…………………………………………………………………………………….…………………….20
Creating a Requirement/
Requisition
Posting Requirement to Source/
Vendor
Posting Resumes to Portals
Searching Resumes
Attaching Candidates to
Requirement
Sending Screening mailers to
candidate
Screening the Resumes
Sending Resumes for Review
Interview
Scheduler……………………………………………………………………………………………………………..29
Scheduling Interviews
Sending Interview Communication
mailers
Updating Status
Offer
Manager……………………………………………………………………………………………………………….…..31
Offer
Details
Calculating CTC Breakups
Generating Offer Letter
Sending offer letter to the
candidate
Updating status of the candidate
Offer – Joining Follow Up
remainders
Reports………………………………………………………………………………………………………………………………35
User performance Report
Customer performance Report
Daily Report
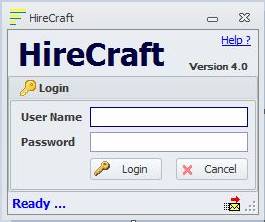
HireCraft Login:
In
order to use HireCraft you need to first login with a User Name and password
provided to you by the administrator of HireCraft in your organization.
Enter
your user name and password into the respective fields, as provided in the
login window and hit the Enter key or press Login button.
What to do if you forget the password?
If
you have forgotten your password, you can contact the administrator of
HireCraft to reset the same and by default the password will be created as 'hirecraft'.
Due
to security reasons of your user name, we strongly recommend you to change your
password immediately once you login with your new password. To do so follow the
instruction below:
Navigate
to Action menu located on top left
corner of HireCraft application, and click Change
Password.
Enter
the Old Password, New Password, confirm the new password and click on Submit to
change the password.
Note: Your new password will work, from the next
time you open HireCraft.
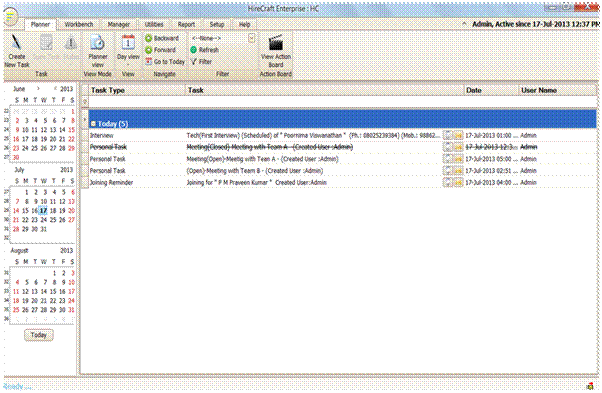
Planner:
The
Planner in HireCraft is similar to your personal diary, which reminds you of
your daily tasks like, meetings, Follow-ups, To do tasks, Interview Schedules,
Joining Reminders...etc. Apart from being able to generate automated tasks like
Interview Schedule information, Contract expiry notifications, Joining
Reminders, SLAs...etc., it will also allow you to create your own task on a
specified date & time.
As
soon as you log into HireCraft application, Planner view is what you see
always. We have intentionally made this to be visible initially, since, the
start of your day should remind of you of any tasks that are noted for a
current day or anything that is pending previously.

Planner
contains six sub tabs given below…
- Task – This
feature is used to create new task and update the existing task.
- View
Mode – This allow user to change the view (Planner / Grid) of
planner.
- View - This
allow user to switch the view (Day view / Week View / Month View etc) of
planner as per need.
- Navigation – this
allow user to navigate on previous date or next date of planner.
- Filter – This
allow user to create and run the customized Planner Filter.
- Action
Board – This allow user to enable the Action Board.
Task
Manager:
Using
Task Manager you can create your own tasks other than those generated by
HireCraft. For instance, when you need to make note of a meeting with your Boss
or a Client on some date, you can enter some information relating to that using
Task Manager and press save on the toolbar. When you log into HireCraft on the
date you had specified meeting information, they are shown in the planner. So
you don't miss out any of your tasks, even if you forget HireCraft will remind
you.
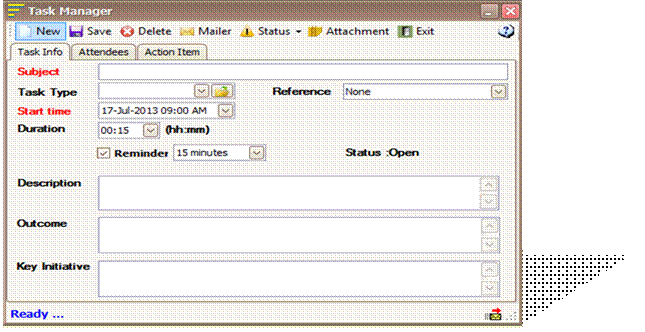
Creating Tasks:
To
create your task double click anywhere within the planner view to invoke task
manager window, and enter the following information:
Subject: Enter the
subject for your Task. Example: Meeting with Client or Call the candidate etc.
Type: Select the
type of task from the drop-down
Target Date: Select
target date of the task from drop-down calendar. You can even use UP & DOWN
keys on keyboard to scroll through the date, month, year and time.
Meeting
Duration:
Type the duration which your task may go up to
Status: Choose
whether task is open or closed. By default any new task created is Open.
Reminder: Check the
reminder checkbox and choose the duration of pop-up reminder you want to get.
Description: Enter the
description of your task.
Outcome: Enter the
Task outcome.
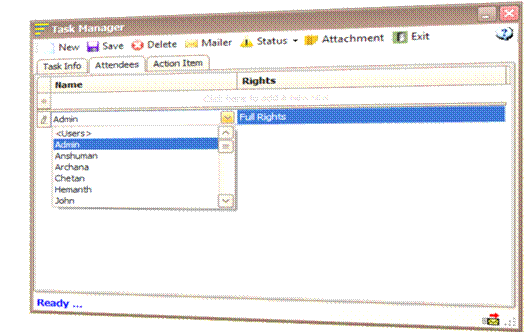
Sharing
Tasks:
Another
unique feature of HireCraft is its ability to share your tasks with other
HireCraft users in your organization. In the event when you need to share the reminders
with other users, first create the task as usual and select the users from the
drop-down list by clicking within row of Name column (see figure below),
likewise choose Rights on the right column of the same row. You will have to
follow the same process for every user, you share reminders with.
About Rights: Apartment from sharing your tasks, you can also set rights to a
shared user, which are explained below
Read Only: Means that user can only view task and not make any changes to the
task
Change Rights: User can make changes to or edit your tasks
Full Rights: Apart from making changes, user can even close your task
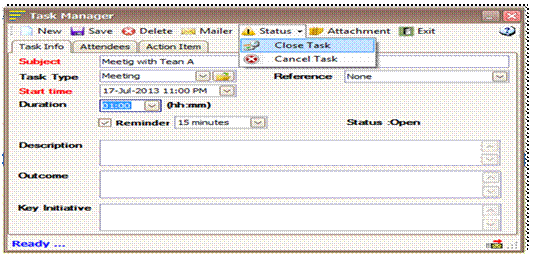
Closing
Tasks:
You
can close any tasks that you would not like to be reminded of. Please note,
unless you close any tasks they keep appearing in your pending tasks list on
every subsequent dates.
To
close a task double click on a particular task in the Planner view and click
"Close Task" button in Status tab and press "Save" button on the toolbar.
Grid view of
Tasks:
Grid
view of task contains all task for the day with Email and SMS facility to share
the updated status with concern person. Closed or Cancelled task will be strike
out showing that action has been taken and task is over. Pending tasks are the
one that are not closed.
Pending
tasks are not only the ones that you created and not closed, but including
those defined in your SLAs settings.
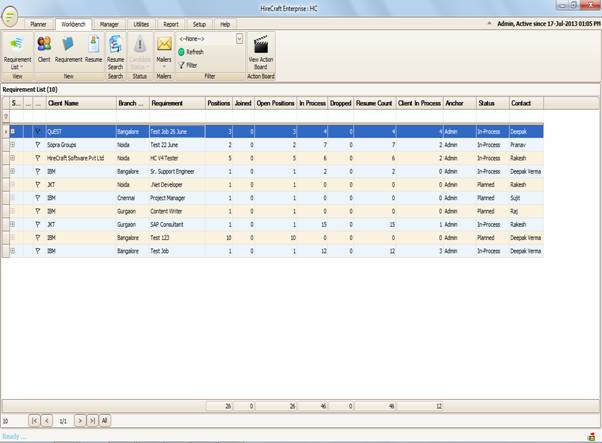
Workbench:
Workbench
provides a platform to carry on with the recruitment activity from end to end.
Work bench has four main parts.
- View – This
tab contains Client List, Requirement List and Candidate List.
- New – This
section provide the facility to open the Client Manager, Requirement
Manager and Resume Manager.
- Resume
Search – This section provides the facility to enable the HireCraft
search engine.
- Candidate
Status – This section provides the facility to validate the candidate.
- Mailer – This
section provides the facility to send the mailer from HireCraft.
- Filter – This
section provides the facility to run the Client Filter, Workbench Filter
and Candidate Filter.
- Action
Board - This section is used to enable Action Board.
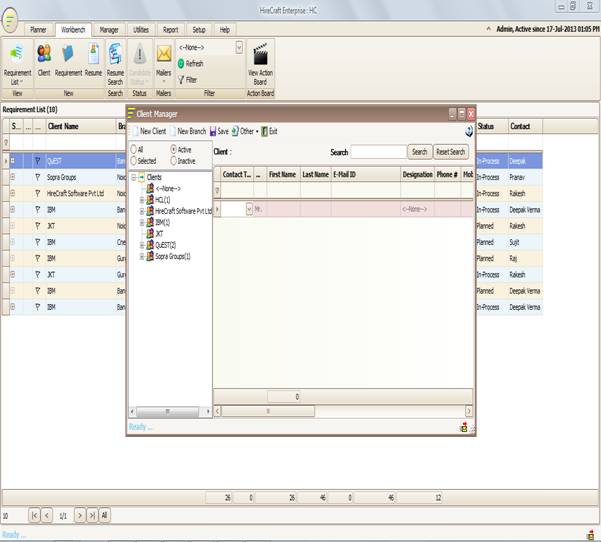
Client
Manager:
Client
Manager in HireCraft allows you to centrally store and retrieve information
about your BU’s. You can use it to create, modify or delete information about
the Unit.
You
can also add, modify or delete additional information like Departments, Interview
Venues that are related to a particular Client Manager.
To
use this feature navigate to menu Workbench
-> Client.
Creating
a New Client:
To
create a new Client, click on the New Client button on the toolbar and
enter the information related to a Unit as shown in the figure
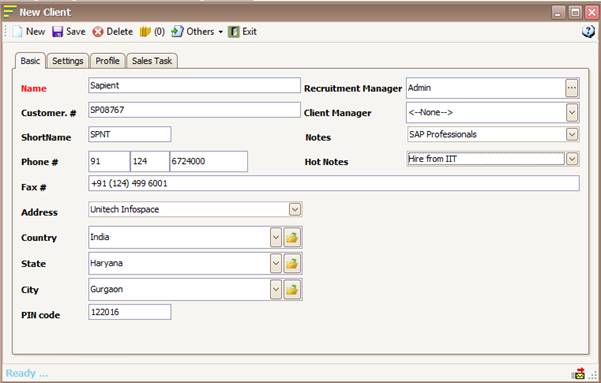
Key
in the following information in the basic tab of New Lead Window:
Name: Enter the
Client Name.
Address: Enter the
address of the client.
Phone: Can be
used to key in the primary phone number of the client.
Fax: Can be
used to key in the fax number of the client.
Country: Select the
country to which the client belongs.
State: Select the
state to which the client belongs.
City: Select the
city where the client is located.
Pin Code: Enter the
Pin Code or the Zip Code of the city where the client is located.
Recruitment
Manager:
The Recruiter managing the Particular Client Requirements.
Notes: Can be used
to describe the client.
Click
on save to save the BU Details to the database.
Creating
a Contact:
Contacts
can be used to capture the details of the Line Managers responsible for the
requirements that are assigned to the recruitment team.

Client: Select the
name of the Client to which the line manager reports
Branch: Select the
branch of the Line Manager (Requester).
Division: Select the
division of the line manager.
Salutation: Select the
Salutation (Mr., Ms, and Dr. Etc.)
First Name: Enter the
First name of the client contact.
Last Name: Enter the
last name of the client contact.
DOB: Select the
date of birth of the client contact.
Email ID: Enter the
email id of the contact.
Phone: Enter the
Office phone number
Mobile: Enter the
Mobile number
Fax: Enter the
Fax number
Designation: Select the
Designation of the contact person.
Status: Select from
the drop down whether the contact person is Active, Retired etc. (Active if the
contact is working, quit if the client contact has quit from the client)
About
Requester:
Can be used to enter some details about the client contact person.
User ID: Can be used
to set the user ID for the intranet module login.
Password: Set
password for the Intranet module.
Reports To: Select the
Manager to whom the contact reports to.
Project: Select the
project controlled by the Line Manager.
Vendor
Manager:
Vendor
Manager allows you to capture the details of all the vendors or the resume
sources that help you in sourcing the candidates for the requirements. To
create of edit the source details navigate to Manager > Source Manager.
Capturing
Source Details:
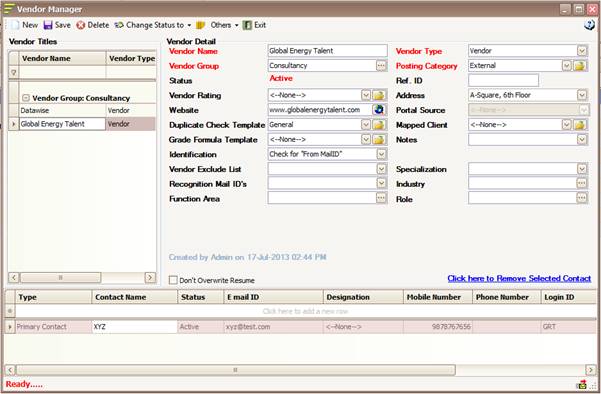
To
capture the source or vendor details open source manager and fill the following
fields:
Vendor Name: Enter the
name of the source or the vendor.
Vendor Type: Select the
Type of the source.
Vendor
Group: Select
the Source group.
Address: Mention the
address of the source or the vendors.
Website: Mention the
Website for the source or the vendors.
Duplicate
Check Template: Select the Duplicate Check Template.
Identification:
Select the
Identification method to be used.
Vendor
Recognition mail ID: Mention the domain of the mail id (@hirecraft.com)
Notes: Can be used
to capture any details related to the Source or the Vendors.
Capturing
the Vendor Contact Details:
To
capture the contact person details for the source navigate to source manager
and select the respective source name from the list displayed in the left
panel.

Mention
the following details:
Contact Name: Mention
the name of the Contact person for the Source.
Status: Select the
Status of the contact.
Email ID: Mention
the Email ID of the contact.
Designation: Select the
Designation of the contact.
Mobile Number: Mention the Mobile number of
the contact.
Phone Number: Mention the direct line number
of the contact.
Login ID: Mention the login id for the
contact if in case you have opted for Vendor portal.
Password: Mention
the password for the vendor portal (if opted).
Parsing:
Parsing
is the process of saving the resumes in HireCraft. Resumes can be parsed from
the mail (outlook) or from your hard disk or from website.
Saving
Resumes from Hard Disk to HireCraft:
To
save any new resume that is stored on your computer, click on the Workbench -> Resume button on the toolbar and then click Open button to browse for a resume
located on your computer. Upon selecting the resume, when asked "Do you want to parse this resume?"
click yes. And the selected resume is attached and depending on the information
available in the resume, they are automatically filled into respective fields
above.
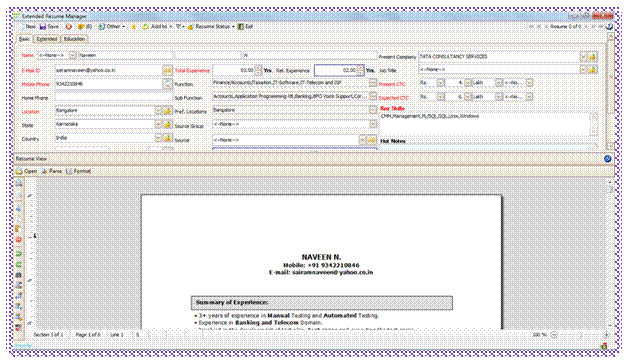
Once
the information is parsed press save
button on the toolbar or hit F3 on
the keyboard to save the resume. You will also be notified in the status bar
below whether resume has been saved or need any valid entries.
Every
time you make changes to an already saved resume or new resume you need to save if desired, else they will be
discarded. You will have to follow the above step if you're going to save any
new resume subsequently.
Saving
Resumes from Outlook to HireCraft:
Another
unique feature of HireCraft is its ability to parse resumes directly from
Microsoft Outlook, so that you don't need to first save resume attachments to
your computer and then to HireCraft.

Parse: To parse
the single mail attachment from outlook, select the mail having the attachment
of resume and click on Parse button. HireCraft pulls the resume from the
outlook and shows the same in the Resume Manager.
Parse
(Silent):
To parse multiple mail attachments from outlook, select the mails having the
attachments of resume and click on Parse (Silent) button. HireCraft pulls the
resumes from the outlook and saves the same in the database directly.
Saving
Resumes from Portals to HireCraft:
HireCraft
Allows you to directly save the resumes from the different candidate portals
like the Monster, Naukri, times jobs etc. To save the resumes directly from the
portals navigate to Manager > Import
from portals.
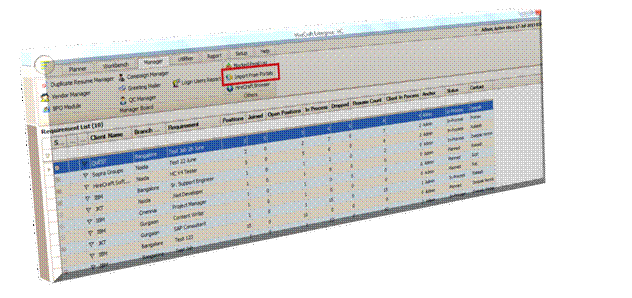
Choose
the Source from which you want to
download the resumes to HireCraft. HireCraft opens the login page of the
portal, mention the credentials and login. Perform a search using the various
methods as used commonly.
Once
the list of resumes are shown in the page click on the Load Search Results to Grid button. HireCraft reads the resume
details and displays all the resumes in the page to the temporary buffer and
displays the details of the candidates in the screen below. Select the
respective candidates that are to be downloaded and click on Download Resumes button to save the
selected resumes to the HireCraft database.


Creating a
New Requirement:
To
create a new requirement click on Workbench
->Requirement option toolbar.
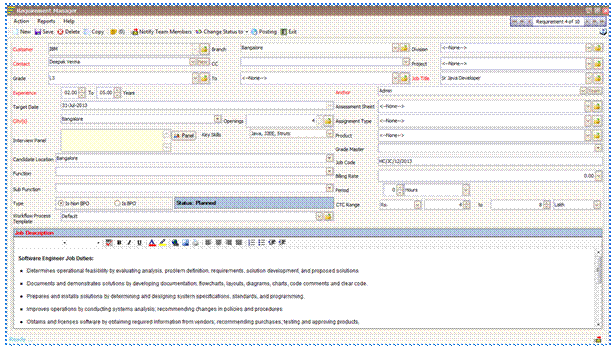
Enter
the following information in the Requirement Manager:
Customer: Select the
Client Name from the drop down to which the search brief is generated.
Branch: Select the
branch from the drop down.
Contact: Select the
name from the drop down.
Division: Select the
Division to which the requirement belongs.
Project: Select the
project.
CC: Select the
Managers or the contacts to which the mails are to be copied during
communications with line managers.
Grade: Select the
Grade or level of the role.
Openings: Mention
the number of openings.
Job Title: Enter the
position title or the Requirement title.
Experience: Mention
the Experience levels that are to be considered.
Type: Select if
the requirement is processed for BPO or Non BPO.
Anchor: By default
picks up the name of the recruiter creating the requirement. If the requirement
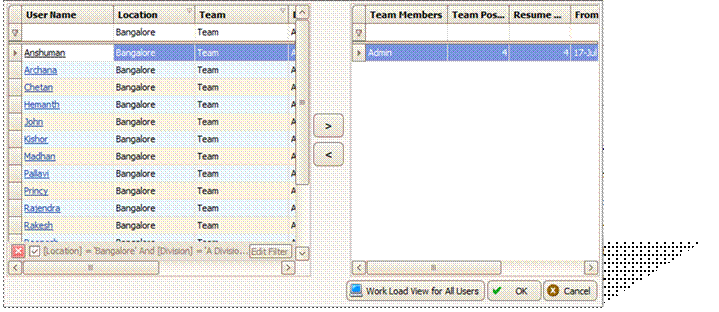
has to be assigned to different team members click on the ![]() button and select the respective team members.
button and select the respective team members.
Location: Select the
location of the position posting.
Interview
Panel:
Select the Panel members who are responsible to take interviews for the
candidates mapped to the requirement.
Job
Description: Type or copy and paste the job description of the requirement.
Sourcing
Guidelines:
Mention the sourcing guidelines to the recruiters or to the team members.
Save
the requirement clicking on Save button. Once the requirement is saved you can
send the mailers to all the team members on the requirement details by clicking
on the Notify Team button.
Requirement
Posting:
Requirement posting can be used to send
mailers to the vendors or to the referrals for sourcing or sending the resumes
of the candidates to the specific requirement.
This
option can also be used to post the requirement to the portals like the
monster, naukri or any other job portals.
To
do the posting open the respective requirement and then click on posting.
Vendor
Posting:

In
the Source Posting tab select the group from the source group field and then
add the respective Consultancy or the Referrals or any other vendor or source.
Select
the respective sources or the vendors, select the mail template and then click
on send to deliver the mail to the respective sources.
Web Posting:
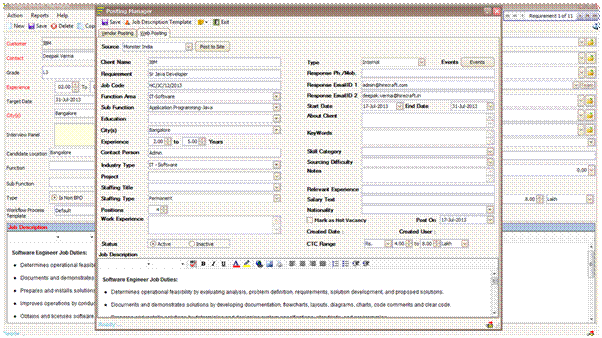
To
post the requirement on any of the job portals like the monster or the naukri
navigate to Web posting in the posting manager. HireCraft picks up all the
details mentioned in the requirement manager. Any further details to be added
can be edited.
Select
the source to which the requirement needs to be posted and then click on post to site. HireCraft opens the login
page for the specific portal, mention the credentials and login. In the posting
page click on merge data button. All
the details mentioned in HireCraft will be copied to the web page form, check
the details and click on submit or save to post to the job portal.
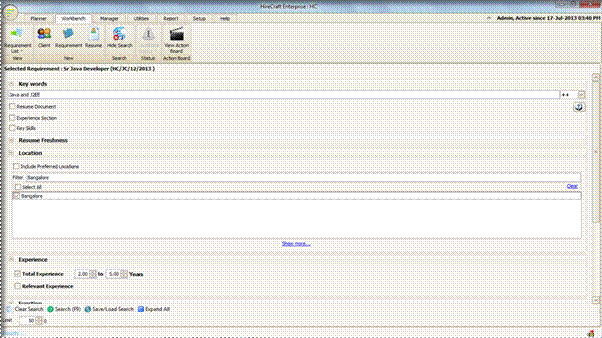
Searching
Resumes:
You
can use the search filter to search for the resumes saved in HireCraft
database. In the workbench click on Resume
Search button. Mention the keywords to be searched in the resume and click
on f9 key or search. HireCraft check the keyword in the resume and gives you a
set of resumes matching the specified criterion.
Similarly
the resumes can be searched based on Function area, Sub Function area,
Designation, Present Employer, Location etc.
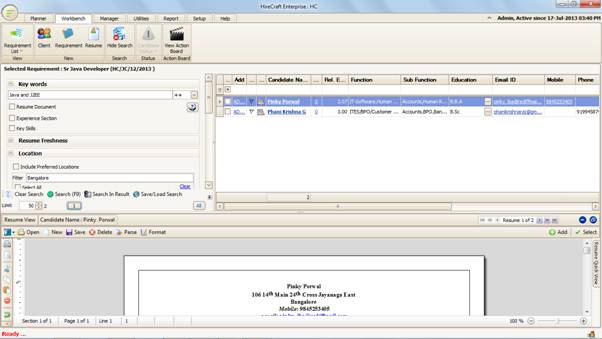
Adding
candidates to Requirement:
To
add candidates to the requirement from the HireCraft search screen click on the
add+ option or select the candidates right click and then select the option add
selected candidates to the selected requirement.
Note:
Click on the respective requirement before choosing the candidates.
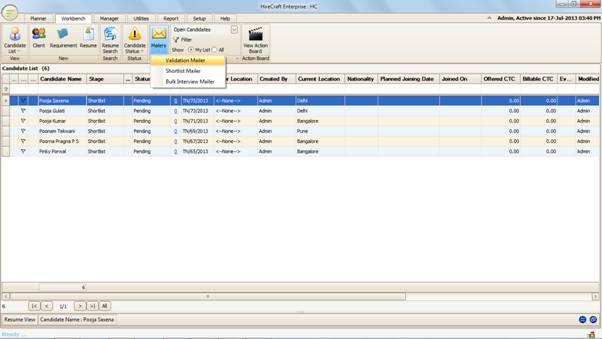
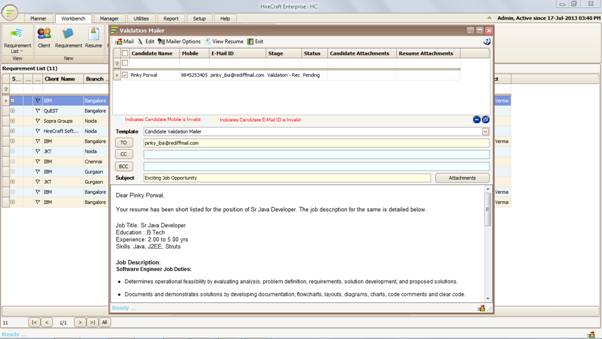
Validation
mailer:
Screening
mailer is an option which can be used to send the mailers to the candidates
selected or sourced for the respective requirements. In order to send the
mailers to the candidates click on Mailer
-> Validation Mailer. Select the respective candidates to send mail and
then the mailer template and click on mail to deliver the mails to the
candidates selected.
Screening
the Candidates:
To
Update the status of the Validation on respective candidates click on the
candidate name and navigate to Candidate
Status > Screening/ Validation and then choose the respective status
options like validated/ Screened/ Drop etc.

Sending CV’s
to line manager for review:
To
send profiles of screened candidates to line managers for review, follow the
steps below:
Workbench
-> Mailer -> Shortlist Mailer command located in workbench panel, to
invoke the Short-list Mailer form. Alternatively you can right click within the
selected candidates list window and navigate to Mailer > Send Resumes
in the context-menu.
In
the window that is displayed, select one or more candidate by clicking on
checkbox before the Candidate Name column in the grid or if you need to select
all the candidates then click on top most checkbox in the heading column to
check all the candidates.
Note: By default the candidates having status as Pending are automatically checked. And candidates
having status as CV-Sent are not checked as they may be sent already, so that
you don't intend to send them again.
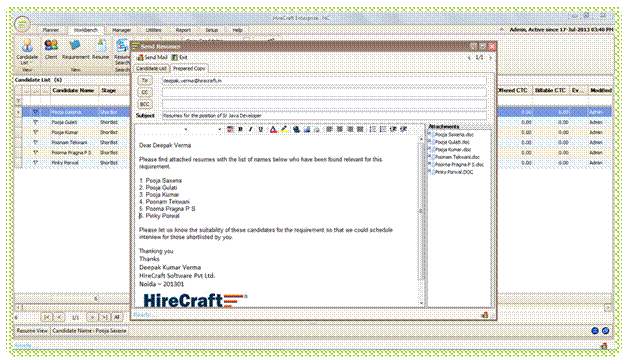
Press
Prepare Mail button and click on sub-menu Sent Mail.
Upon receiving the feedback from the line managers
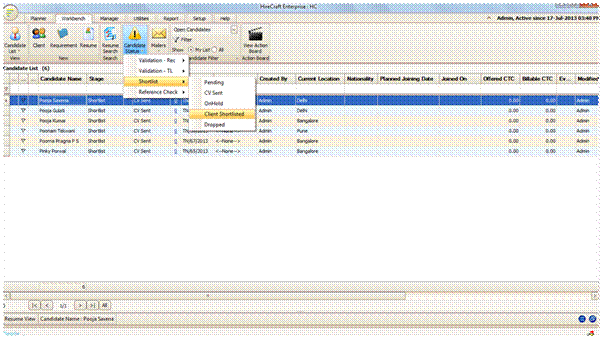
on the profiles sent, update the status accordingly by navigating through Candidate
Status > Shortlist and then select the respective status.
Interview
Manager:
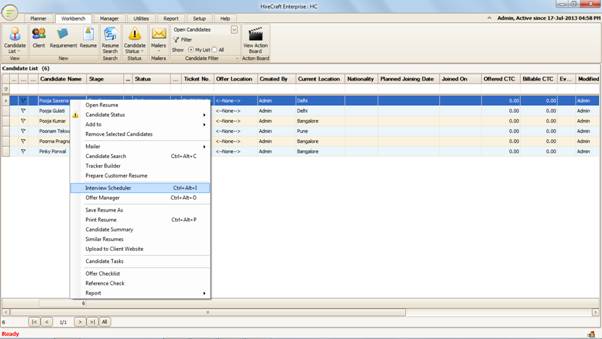
Interview
Scheduler allows you to create and manager Interview Schedules. To create or
manage interviews right click on the candidate and select Interview Scheduler.
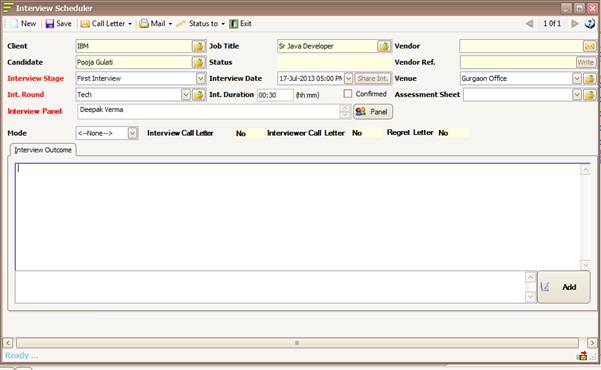
The
details of the candidate and the client are picked by HireCraft, select the
interview round, Panel for interview, venue of interview and the interview date
and time. Click on save to schedule the interview.
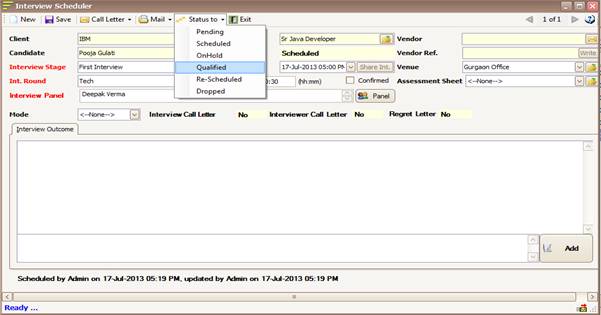
To
update the status of the interview click on status to and select the respective option for the candidate.
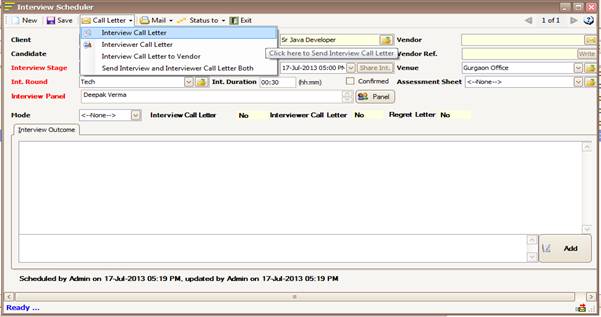
Interview
Schedule Mailer:
To
send mails to the candidate detailing the interview schedule, click on Call Letter -> Interview Call Letter
on the toolbar. Select the template and click on send to deliver the mail to
the candidate with details of schedule.
To
send mails to interview panel detailing schedule of interview click on Call Letter -> Interviewer Call Letter
on the toolbar. Select the template and click on send to deliver the mail to
the candidate with details of schedule.
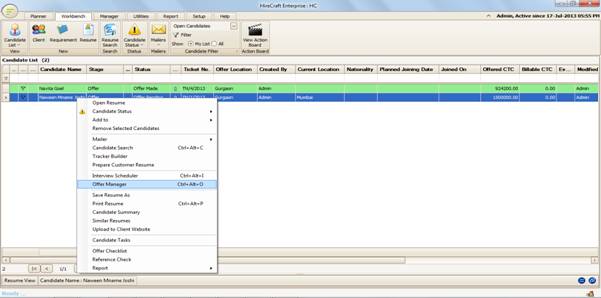
Capturing
Offer Detail:
To
capture the details of the offer related to the candidate select the candidate
and right click then select offer manager from the Workbench.
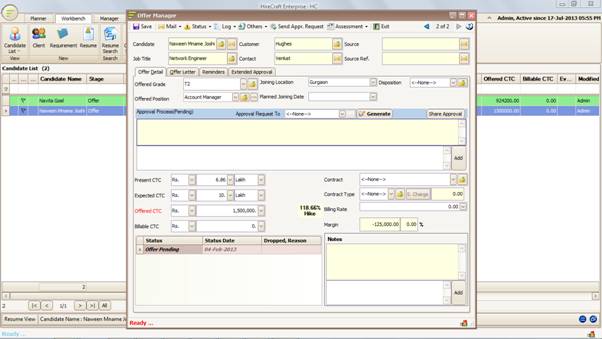
Offer
detail tab can be used to capture information of the candidate offered. The
information captured in the offer detail is Offered Position, Offer Grade,
Offered CTC and Planed joining date, joining location etc.
Enter
the details of the offer and click on save. HireCraft associates the status of
the candidate as Offer Pending. To change the status of the candidate click on
Status and select the respective option for the candidate.
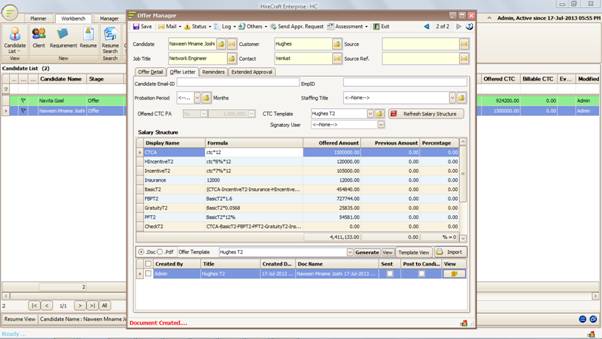
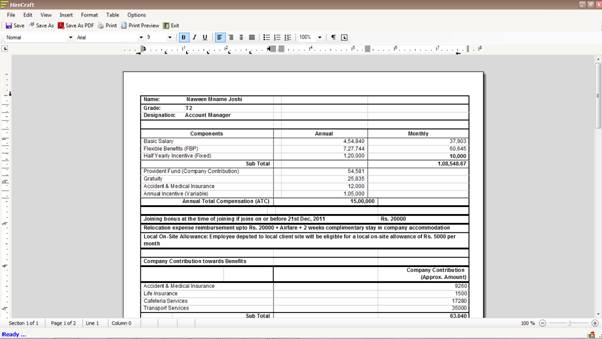
Calculating
CTC Breakup:
To
calculate CTC breakup for the candidate offered based on the offered CTC
mentioned in the offer detail navigate to offer manager and select the tab
offer letter.
To
calculate the CTC breakup select the CTC breakup template, HireCraft will
automatically calculate the breakups as per the formulas that are provided at
the time of creating the CTC breakup templates.

Generating
Offer Letter:
To
generate offer letter navigate to offer manager and then select the offer
letter tab. Choose the respective offer letter template and click on generate
to create the offer letter for the candidate.
By
clicking on view application allow to see generated offer letter.
Sending
Offer Letter to Candidate:
To
send the offer letter to the candidate select the offer letter and then click
on mail > send offer letter to candidate. In the mailer that opens the offer
letter will get attached automatically. Click on mail to send the mail to the
candidate with the offer letter.

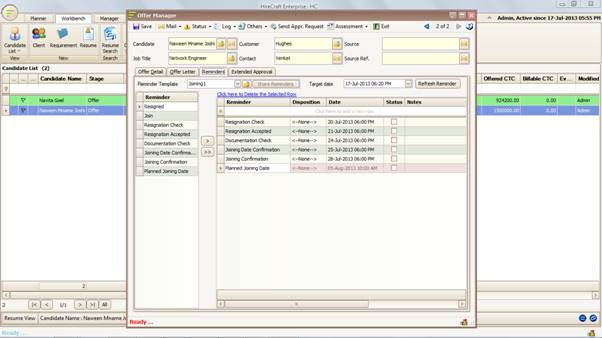
Reminders:
Reminders
allow you to create a series of follow up reminders up to a specific date. To
generate reminders select the reminder template and select the reminder date
(normally the planned joining date).
Add
the Respective Remainders to the selected remainder list. HireCraft will
automatically calculate the dates for remainders based on the Target date
(normally the planned joining date).
Click
on Refresh reminder to recalculate the days if in case the planned joining date
has changed.
Reports:
HireCraft
allows you to automate the reports that are commonly used on for the
recruitment process and for management of resources. Some of the Standard
reports that are available in HireCraft are discussed below.
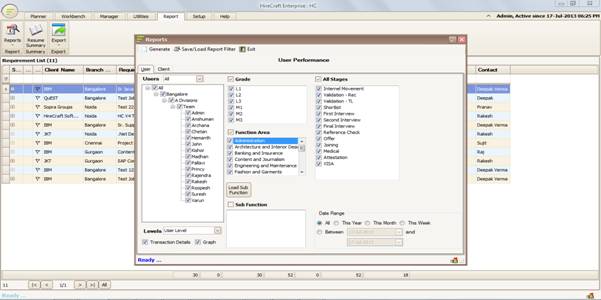
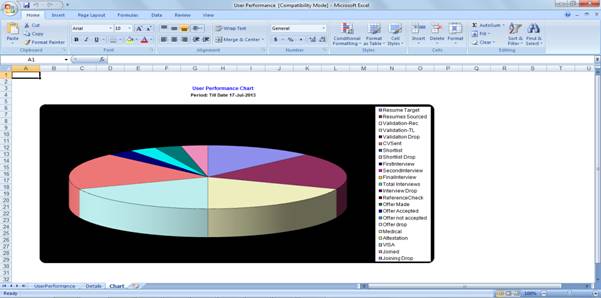
User
Performance:
This
report will provide you information on the number of openings that are handled
by each recruiter and the number of candidates that re processed against each
stage of the recruitment cycle. To generate this report navigate to Reports > Performance Reports > User
Performance.

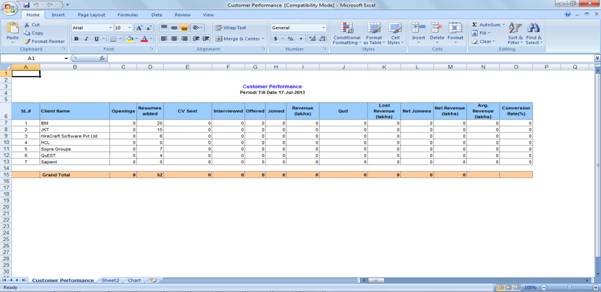
Customer
Performance:
Customer
performance report provides you the statistics of the number of requirement
send to you by the client and the status of the resumes in the different stages
of the recruitment cycle. Thus helping you in arriving or understanding the
conversion rate of the requirement. To generate this report navigate to Reports > Performance Reports > Customer
performance.

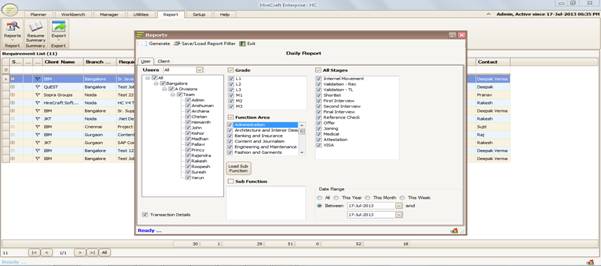
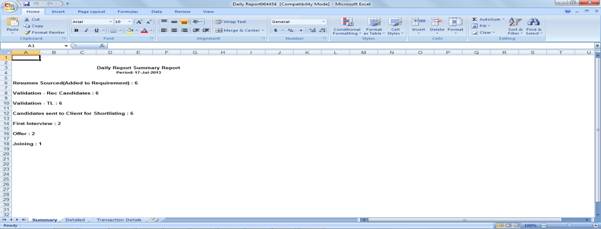
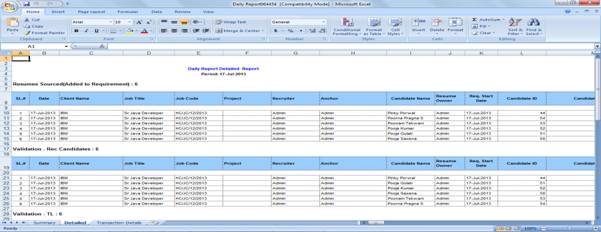
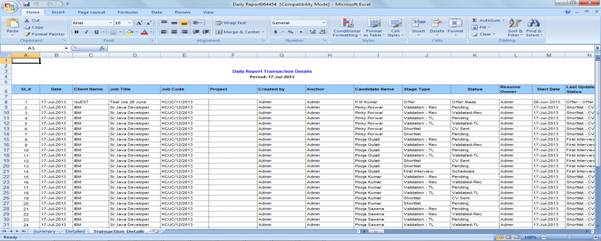
Daily
Report:
Daily
report helps you to get the details of the activities done by each of the
recruiter for the period that is selected. The report will give a summary on
the number of resumes that are parsed, added to the requirement, and in the
different status of the recruitment cycle. To generate this report navigate to Reports > Other Reports > Daily
Report.
For
any other reports related to your organization or if you want to upload your
format of the report to HireCraft please contact the support or the Global Help
Desk.
Thank You
HireCraft Software Pvt Ltd
Phone- 91
(80) 43531100
support@hirecraft.com
Web- www.hirecraft.com