|
|
|


|
Offer Manager |
|
Overview Using Offer Manager you can enter offer related information to a particular candidate who successfully completes all the interview process. You can also use it to add Joining reminders to your planner as well as share them with other users of HireCraft, which helps you in constantly follow-up with candidate till he/she joins for the offered position. |
|
Enter Offer Information To enter the offer information for a candidate who has successfully completed all the interview process, right click on the respective candidate within Selected Candidate List window and click on "Offer Manager" in the context-menu. Alternatively you can press ALT+O on the keyboard or click on "Offer Manager" command on the left of workbench panel to invoke the window as in figure here and enter the following information:
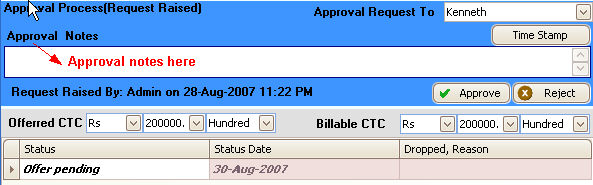
Requesting approval for the offered candidate If you are having an approval process in your organization by senior people, you can select the respective approver name from the drop-down list (see the figure here), and press Send Approval Request button on the toolbar to raise the request. And instantly a reminder in the planner of the approver is automatically added. Once the approver looks at the reminder, they can review the offer information that you have entered and approve the same by clicking on the approve button and optionally enter any notes. They also reject the same by clicking on the reject button. Next time when you open the offer manager to view the status of your request, you can see the status of your request along with any notes if available, either as Request Approved or rejected. Also the buttons Approve and Reject are disabled, unless you are part of the approver group.
You can also send an email notification to the approver by choosing Yes, when asked "Do you want Send Notification to the Approver?" in the dialogue box displayed, and an email from the pre-defined template is generated with the email address of the approver automatically selected in the To address field. You can now simply press Send button and click on sub-menu Mail Only or *SMS only or *Mail and SMS. Similarly the approver can as well send you notification of the request raised, by choosing Yes, when asked "Do you want Send Notification to the Requester?" in the dialogue box displayed. * Visible only if the SMS service is obtained by you and configured. Note: In case you do not have this kind of process in your organization, this functionality may or may not be hidden. If you have the strict process then this should be followed, else be ignored Hints: To enter the offer information for another
candidate attached in the same requirement, press the forward button on
the top right corner of the toolbar, instead of opening the offer manager
for each candidate. See the sample figure below. See Also : |
|
|


Copyright © 2007, HireCraft Software Pvt. Ltd